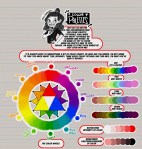
Meg here for TUTOR TUESDAY! Just a quick beginning look at colors and some color theory! I’ve had a few recommendation for color palette stuff, so I hope this is a start! Paul has done some on color as well! If you have any recommendations send ‘em in here or my personal! Keep practicing, have fun, and I’ll see you next week!
So, here’s my method for studying a language with music you like.
1. Find a song you like in your target language.
2. Check if it’s on lyrics translate (both transcribed and translated)
3. Set up your page! Write in the title and author, maybe the language, update your table of contents, etc.
4. Copy the lyrics onto the page!
I use lines to indicate stanzas because it saves space. I also color-coded nouns by gender (feminine=black, neuter=purple, masculine=blue) the rest was in gray.
5. Underline words you know. That doesn’t mean words you think you might know. It means words you can recognize almost immediately.
6. Play the song and follow along with a pencil or your finger, whatever works. Make sure you’re connecting the sounds you hear to the words on the page. Repeat as needed (I only do this once since I’m pretty familiar with german, if you’re new to the language I recommend 2-3 times)
7. Play the song again but without the pencil, only follow along with your eyes. Do this until you feel comfortable.
8. Cover the lyrics and play the song again. I have a special ‘covering-up-stuff-in-my-notebooks’ page but that’s just me, you can just flip the notebook over. Play the song 2-3 times and try to hear the words you know and visualize the words as you hear them.
9. This part involves talking to yourself (70% of my study habits make me look crazy its fine). Now go through word by word and literally just say everything the word brings to mind. i.e.
“euch is such a nice word I enjoy saying it”
“Tür looks like it has a smiley face in the middle. I say that every time I see a ü jeez.”
“I have no idea what they’re saying here”
This is when you look up the words you don’t know and look at the translation. You try to figure out what they’re saying when and what all the words mean. and yes, ALL of this you do out loud. Read the definition out loud, react to it. i.e.
“OHHH that’s what they’re saying there”
“Hey, now I know what schweigt means! wow!”
You’d be surprised how much this helps you. It helps you remember stuff, figure out what you don’t know, keep your thought process linear, its great 10/10 recommend.
10. Repeat steps 6, 7, and 8 again (only play the song once per step). This time pay extra attention to the new words you’ve learned and the meaning of the song.
11. Hey, you’re done now! Revisit every couple of days and maybe just do steps 7 and 9 (that’s what I do but it’s up to you) Of course you can edit this to make it work for you, I invite you to do so. I personally don’t like making vocab lists for everything but if it helps you then go for it! Have fun with it, music is fun! languages are fun! Good luck
Notes:
Here is a link to the song I used in the pics. (Yes I know the song is about how people can be mindless groupthinkers it’s just the song I was using today haha.)
I love using music to learn languages so I really hope this helps someone 🙂
(Sorry if I left anything out or if there’s a typo feel free to message me if that’s the case and I’ll fix it right away! I’m always open to suggestions!)
This was a request and at first I wasn’t sure if I had anything to provide with, but as it turn out it got a little longer than I expected because there were actually things I had to say!! Wow!!
Anyway, this is some guidelines I follow when I try to make the face expressfull, more specifically the mouth! It is often neglected, since it’s actually pretty hard, I’ll admit. But I’m here to help (hopefully…)! A mouth expression tutorial as per request. Enjoy and hopefully it will help some a little. ʕ•ᴥ•ʔ
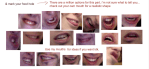
Draw the teeth at the right angle.
This is super important. The upper jaw follows the angle of the head, and the lower jaw will depend on how open it is. Make sure you have a rough estimate of where the teeth are, and how much of them you’re going to see!
The lips will VERY roughly follow the same angle as the teeth. It really depends on the character, but it gives you a sense at least.
If you DON’T do this, you’re going to lose so much volume and the mouth is going to end up looking unrelatable. I showed this example in this tutorial:
It’s not just the lips!
The cheeks, chin, and tongue play a role too!
Try look at your own mouth or references! I have a very pliable and large mouth, so that’s one reason why my characters have it too lmao.
ASYMMETRYYYYY (ง ͠° ͟ل͜ ͡°)ง
I cannot emphasize how important asymmetry is when drawing expressions. It applies not only to the eyebrows to achieve the Dreamwork Face™, but also the mouth. Seriously if you draw a symmetric mouth I will deliver myself to your mailbox and then shout at you until you fix it.
Look at the difference between these two for example: which one has more “life”?
I think you get the idea.
Push and squish – give it flow
Here’s an old drawing I have but it illustrates how I think when I squish the mouth, and use folding and wrinkles to my advantage.
Look at your own face and see where skin bundles up, where it creases the most and when bumps appear on your chin. Subtle details makes all the difference!
One VERY effective detail is illustrated in the first sketch, where I pull upwards on one side, and downwards on the other. That’s a good detail to use when the character is making a skewed expression, or is extremely frustrated. I encourage you to play around with that concept bc it’s ~super effective~!
EXAMPLES:
Happy: Your entire mouth is pushed upwards, not just the corners of your mouth!
I tend to draw a :3 mouth bc I’ve been drawing Lance too much….. You don’t have to but it’s basically imprinted in my motor memory by now.
Pouting/frowning: corners are pushed down, middle pushed slightly up. Sometimes, there’s a slight dip in the middle too. It can give a sense that the character is biting their lips.
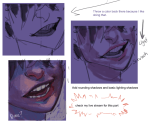
Showing frustration/intimidating/is intimidated: basically showing a lot of teeth. The corners are as open as possible and the middle sorta more squished. An extremely important detail here is showing some of the gums, and open space between the cheeks and teeth. That way it looks like the mouth it open to it’s full potential. Here is also where you basically MUST add folds and bumps, or else it’s not going to look relatable.
(Here I am again with the pulling upwards on one side and downwards on the other, as illustrated on the last sketch)
And then again, here’s just another doodle showing how important it is to show the gums. It’s the same face twice, but the second one looks slightly more frustrated doesn’t it?
As you can see, this last one is very versatile and I draw it a lot. Play around with the basic shape and see how much subtle details makes a lot of difference!
That’s it!
I hope that cleared some things up and was somewhat helpful! Enjoy drawing ✨
omg dont be ashamed at all!! Hands are generally tough to get used to, lots of artists struggle with it! so dont be ashamed i feel you.
and I actually have made a hand anatomy guide before in fact! If you want to get better at drawing hands I def recommend you learn the basic anatomy first. Please check out the ones I made, I try to make it simple and easy to understand:
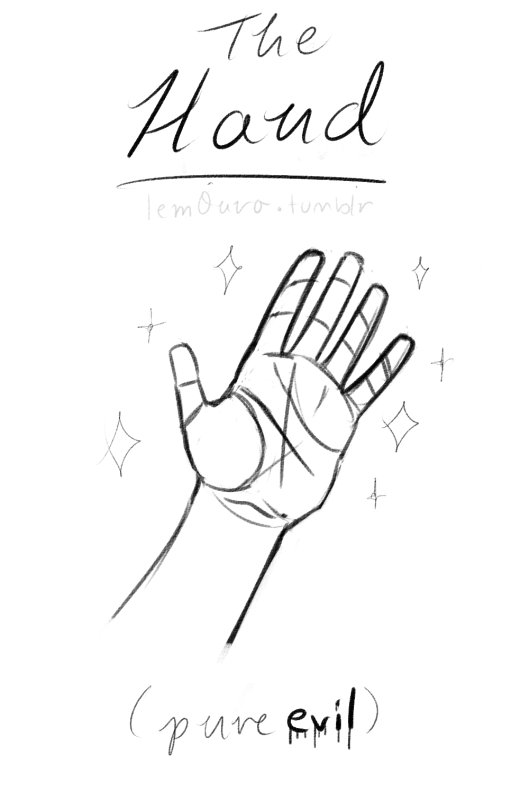
There’s my guide to the anatomy, but here’s some more tips that I’ve noted to myself that I’d like to include
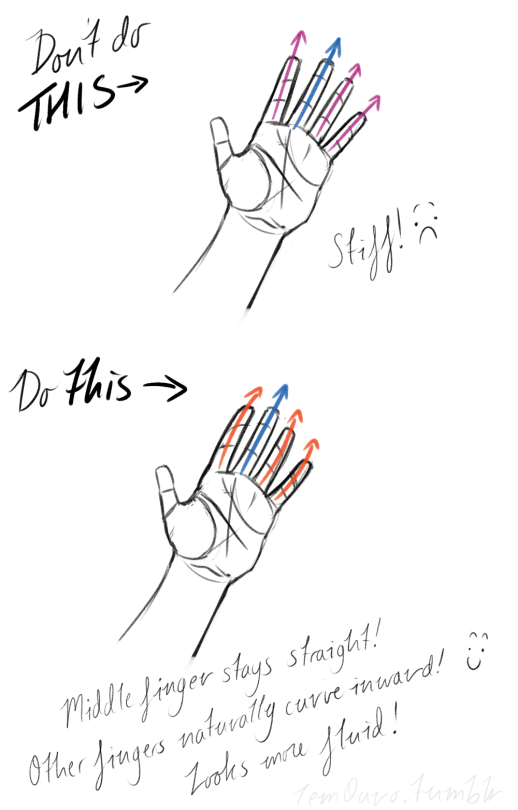
First off, I’d like to just note on the fingers: if you pay close attention to your own hand, you may notice the fingers are ever ever so slightly curved inward. It’s a very subtle detail, but I noticed that, despite how slight it is, it can make a hand look more lively, and less stiff.
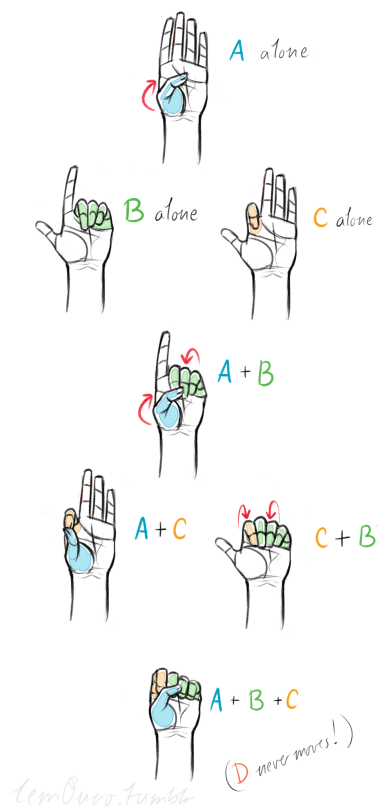
Second, the “M” on the palm! Your hand moves in many ways, and because it does it creates creases in your hand. The most prominent creases appear to make an M shape; this is handy to remember for what I’m going to talk about next. (It also could be a “W” I guess, or to be more specific a “ )X( “; just think of it in whatever way helps you remember!)
SO now that you see the M, draw your hand as a basic blocked shape and add your details. As you do, you can see that the M divides the palm into four basic parts!
When the hand moves, parts A, B, or C of the palm, alone or in different combos, will create the general poses that the hands do normally. These parts are the parts that move, with D being stationary, no matter what!
Here’s a chart of all the possible combos. Once you have down what part of the hand moves for a certain pose, you can change up the fingers and tweak it a bit to do what you need to make it more specific!
This is simply my method of drawing hands. God knows there are hundreds of tutorials out there by other artists, but personally, this way helps me the best (after learning the anatomy first).
This way I can divide the hand and combine the parts in any such way I need!
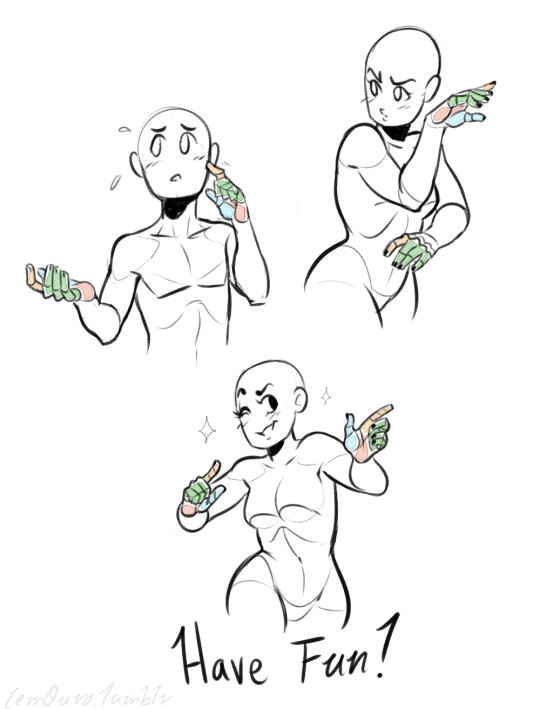
Hands take a lot of effort to grapple, and you need to practice them a lot, especially foreshortening of the hand; that’s really something you need to learn through your own studies. Look at your own hands, draw hands from life, from magazines, shows, comics; just draw hands! You’ll eventually figure out a method that works best for you. So to get better at drawing hands; draw hands!! And don’t stress over it, have fun with it!
UHH tbh the way I color hair is very inconsistent.. I change it a lot but I kinda explained it here and also here’s a short step by step, hope that helps!


You must be logged in to post a comment.