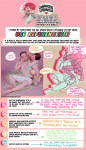
Hey there Anon! Sure thing! I’ll do my best to explain the process of how I usually do things in regards to coloring and shading. I’m not the greatest at Explaining, so I’ll do my best to keep things as crystal clear as possible!
Step 1: Lineart I’ll start with Lineart purely because this step is important to the coloring process in one regard, and that is making sure the entire line layer is closed without any holes. Even the smallest little gap will make the selection process hard later, and we don’t want that. So the cleaner lineart you have, the better. I’m going to go ahead and use my Monster Hunter Generations Huntress for this.
Step 2: Selection Either in Photoshop or SAI or whatever you use, click outside your character and any other negative space surrounding them. This means…basically anything that’s not your character. Then go to Selection > Inverse and invert the selection. You should have something similar to what I have below. This makes it so much easier to add colors without having to worry about all the little nooks and crannies that could mess the cleanliness of the drawing up real bad.
Step 3: Flat Base Create a new layer beneath your line layer with the selection still active. This will be our color layer. Remove the visibility of the line layer, and fill the remaining “Silhouette” with a dark base color. This makes those nasty corners look a bit cleaner, as sometimes if there is a lighter color your computer will want to make them stand out pixelated. Again, this is just for cleanliness beneath the line layer. Turn your line layer back on, as they will now act as barriers for the fill bucket tool. Make sure the entire silhouette is filled, and that no lines were accidentally selected! You want a see a completely filled and flat color if you turn the line layer off.
Step 4: Flat Colors At this point you can lock the transparency of your Color Layer, and go ham. Either with the pen or a fill bucket, figure out how you want to color your character and add in the flat colors. Notice I’m on the same layer as the Base that we made. This is so those lines still play nicely with one another. Clean up where necessary.
Step 5: Analogous Color Gradient Well, we don’t really want our character to be too flat, do we? This is where the color wheel becomes your best friend. Select similar colors with the Magic Wand (like I’ve done her skin tone here) and using the color wheel, choose an analogous (that means “close by” in color wheel terms) color to add a bit of depth to the color. For skin, I usually go with a red or a bronze, sometimes purple. Use the airbrush for this. Then, deselect and select another color to gradient, until all the colors have some degree of new color to them.
See? Now things look interesting! We added some blue to the greens, some purples to the reds, some blues to the grays and so on and so forth.
Step 6: Shading Okay, here’s where things get interesting. Time to shade. Make a new layer between the Line Layer and Color Layer, and make sure you make it a clipping group/clipping mask. This is so it won’t go anywhere that you don’t have color. Set it to multiply or linear burn (whichever you think looks best) and bump the opacity down to about 40-50%. Choose a color that you want the shadows to be; I like deep pinks and purples. I first use the Pen tool to get down “hard” shadows – shadows cast by hard materials, close shadows, and inorganic materials. Once I’ve got those down, I head on over to the softer areas, such as the skin, hair and cloth and alternate between the watercolor and marker tools to give “softer” shadows. There’s no real law to this, you just have to know where shadows fall and how they behave and work with those three tools to get the look you want.
Step 7: “Highlights” – Rim Lighting Okay, these aren’t really “highlights” in the correct sense, but adding sort of “rim lighting” around forms really helps make a picture pop. To do this, make another layer above the shading layer, set it to “screen” and keep the opacity at 100%. Then, get really familiar with your CRTL key because you’re going to be color sourcing a lot. To add a rim light to a form, select the base color of that form, and use the marker to trace along the edges. For example, I picked up the nude from the skin, the silver from the dagger, the gold and maroon from the hair and the tawny brown from the skull to use on those specific objects. Any place you want clean works well, but the edges of forms works best for this technique. Additionally, if you’d like, you can create another layer above the Screen Layer and set it to Linear Dogde, and do my “glowing eyes” technique on anything you want to stand out, such as the metal of the belt, gold objects and of course, eyes.
Step 8: The Overlay Almost done! While your photo can now stand alone as “finished”, there’s one more thing that I enjoy doing, and that’s adding a simple color overlay to bring the whole picture together. This is done by flattening all the layers you have so far (you’ll want to “Merge Down” in order from bottom to top or “Flatten” to avoid the layers going crazy on each other) into one layer. Then, make a layer on top of that one, set it to a clipping mask, and set it to “overlay”. With the Airbrush, choose some colors (I prefer soft pinks, blues and violets) and go along the “edges” of your character with a BIIIIIG brush. This kind of resembles soft ambient lighting or shadows. I just think it makes the photo look nicer.
TA-DA! And Now we’re done!
And there we go! I hope that helped, and I also apologize cause this ask sat in my box for awhile and I never got around to it until now. 😛 I’d be happy to answer any questions y’all have, but this is the simple basics! Remember to practice practice PRACTICE! -Gael
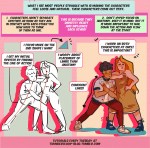
Hey friends! Meg here for a really, long, wordy TUTOR TUESDAY! This week we take a look at drawing characters that are interacting. If you need help with anatomy here are a few tutorials: legs, arms/legs, necks, and here is a previous tutorial on poses. If you have any tutorial suggestions send ‘em in here or my personal. Now go forth and I’ll see you next week!
OH MY GOD whyyyy did no one tell me you’re supposed to send thank-yous after interviews?? Why would I do that???
“Thank you for this incredibly stressful 30 minutes that I have had to re-structure my entire day around and which will give me anxiety poos for the next 24 hours.”
I HATE ETIQUETTE IT’S THE MOST IMPOSSIBLE THING FOR ME TO LEARN WITHOUT SOMEONE DIRECTLY TELLING ME THIS SHIT
NO ONE TOLD YOU???? WTF! I HAVE FAILED YOU.
Also:
Dear ______:
Thank you so much for the opportunity to sit down with you (&________) to discuss the [insert job position]. I am grateful to be considered for the position. I think I will be a great fit at [company name], especially given my experience in __________. [insert possible reference to something you talked about, something that excited you.] I look forward to hearing from you [and if you are feeling super confident: and working together in the future].
Here are some of the very best apps for students; either in highschool or in college. I have used many of the following apps, but not all of them. Some, I have just asked friends about and they suggested those ones.
Please enjoy the apps below, tell me how you like them, and feel free to add onto this list 🙂
Language Learning: Duolingo, Memrise, Busuu, Babbel, Livemocha, Living Language, Tandem, MindSnacks
Games: Lumosity, Sudoku, TanZen, GeoMaster Plus HD, Speed Anatomy, Star Walk, LeafSnap, Splice: Tree of Life, Vismory, Pigments, Viridi, Sunshine, Nota
Test Prep: Khan Academy, Magoosh ACT Flashcards, The Grading Game, Math Brain Booster, ACCUPLACER Study App, CK-12, NRICH, StudySync, Quizlet, StudyAce, That Quiz, Brilliant, Synap
Planner:Timeful, Remember the Milk, Listastic, Finish, 2Do, iStudiez Pro, MyHomework Student Planner, My Study Life, ClassManager, MyLifeOrganized, Daily Agenda, Schedule Planner, Todoist
Inspiration:TED, Lift, Believe It: You Will Achieve, BrainCourage, Get Inspired, iFundamentals, Reinventing Yourself, iWish, Pozify, Positive Thinking – The Key to Happiness, The Gratitude Journal
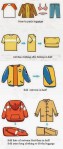
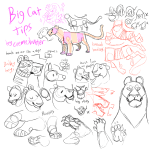
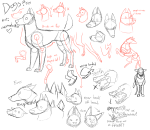
By no means am I a teacher these are tips on how I personally draw stuff. That being said I will be uploading much more in detail tutorials about anatomy and background/scenery construction on my Patreon exclusively in the future as these were just 20 minute quick cheat sheets so to speak.
So I was taught a lesson in how to get rid of a migraine in 30 seconds and omfg listen my migraines don’t go away ever but I was shown what part of my body to touch and like???????????????
It’s witchcraft????????? Like I would be burned at the stake if I lived in ye olde days knowing that information?????
What the fuck??????
Spill it! Lol….Hooooowwwww?? Had migraines since age 9….😓😓😓
Its called the T4 push, but I literally can’t find the info online????? I guess I’m not searching good enough? These medical fuckers are holdin out on us lol.
It’s best to have someone do this for you while you stand up and relax your muscles as best you can, but if you’re alone, a tennis ball and a flat surface will probably work. Alternatively you can lie on the edge of a bed at the pressure point. (But no really do try to find someone to do it for you)
Find the area in your spine between either the first, second, third, or fourth vertebrae. It should be sore and uncomfortable to press down on, so look for the one that’s most painful, and press down with as much pressure as you can on that area for 30 seconds.
Realize that 80% of your pain has magically disappeared and keep the info secret if you live in a small puritan town, lest you be tried for witchcraft.
If you don’t have to worry about being burned or hanged, then share the info with your migraine suffering friends.
As someone who wrote a 10k word paper on pressure points for a high belt ranking test in her martial arts class, I can tell you that you just found a pressure point used in acupressure and acupuncture to relieve pain, particularly that in the head. 🙂
Hand to god we discovered this by accident when my husband was rubbing my neck and I nearly collapsed it felt so good
This post was sent by literal angels??? I’ve had a persistent low-level headache for nearly 24hrs and now it’s gone??? In 30 seconds? What gods did you sacrifice to for this information!?!?


You must be logged in to post a comment.