thundercluck-blog:

Hey, friends!

It’s Meg with another TUTOR TUESDAY!, I’ve finally bit the bullet and tried out a hand tutorial! Hopefully there’s something new that will help you along with hands! If you have any tutorial recommendations for next week, lemme know! As always, keep practicing, have fun, and I’ll see you next week!

kangarohcreations:

acelordsin:

systlin:

triforceofdoom:

mittensmcgee:

samthor:

transgirljupiter:

armeleia:

pomegranateandivy:

screamingnorth:

gunmetalskies:

Here’s a “life-hack” for you.

Apparently concentrated Kool-Aid can be used as a pretty effective leather dye.

I was making a drink while cutting the snaps off some new straps for my pauldrons and I got curious, so I tried it, thinking, “ok even if this works, it will just wash out.”

Nope.

It took the “dye” (undiluted) in about 3 seconds. After drying for about an hour and a half, it would not wash off in the hottest tap-water. It would not wash out after soaking for 30 minutes.
It did not wash out until I BOILED it, and even then, only by a tiny bit and it gave it a weathered look that was kind of cool.
Add some waterproofing and I’d wager it would survive even that.

That rich red is only one application too.
Plus it smells great, lol.

So there you go, cheap, fruity smelling leather dye in all the colors Kool-Aid has to offer.

WELL THEN!

this may be important to some of my followers *and certainly not just getting reblogged because of my costuming and my boyfriends desire for leather armor*

When I was in middle school we used to use it to dye our hair.  Potent stuff.

If you’re dying anything with kool-aid it’s best to use SUGAR-FREE ones otherwise the thing you’re dying might get all sticky

the flavor only packets where you are supposed add sugar are the best. 
they will dye any natural fiber: leather, wool, cotton, hair,  flax, jute, silk and so forth. 
heat the dye water so it is more potent. 
let dry then rinse excess out in cold water. 
there’s  a whole system to this. 

Oh my god

This will prove very useful for any future cosplays I wanna do.

DUDE

And now I’m like “holy shit can i dye alpaca with this?”

My friend dyed her hair with this so it does not fucking surprise me you can do this shit.

Tips to learn a new language

amateurlanguager:

thepolyglotblog:

darasteine:

The 75 most common words make up 40% of occurrences
The 200 most common words make up 50% of occurrences
The 524 most common words make up 60% of occurrences
The 1257 most common words make up 70% of occurrences
The 2925 most common words make up 80% of occurrences
The 7444 most common words make up 90% of occurrences
The 13374 most common words make up 95% of occurrences
The 25508 most common words make up 99% of occurrences

(Sources: 5 Steps to Speak a New Language by Hung Quang Pham)

This article has an excellent summary on how to rapidly learn a new language within 90 days.

We can begin with studying the first 600 words. Of course chucking is an effective way to memorize words readily. Here’s a list to translate into the language you desire to learn that I grabbed from here! 🙂

EXPRESSIONS OF POLITENESS (about 50 expressions)
     

  • ‘Yes’ and ‘no’: yes, no, absolutely, no way, exactly.
       
  • Question words: when? where? how? how much? how many? why? what? who? which? whose?
       
  • Apologizing: excuse me, sorry to interrupt, well now, I’m afraid so, I’m afraid not.
       
  • Meeting and parting: good morning, good afternoon, good evening, hello, goodbye, cheers, see you later, pleased to meet you, nice to have met.
       
  • Interjections: please, thank you, don’t mention it, sorry, it’ll be done, I agree, congratulations, thank heavens, nonsense.
       

NOUNS (about 120 words)

  • Time: morning, afternoon, evening, night; Sunday, Monday,
    Tuesday, Wednesday, Thursday, Friday, Saturday; spring, summer, autumn,
    winter; time, occasion, minute, half-hour, hour, day, week, month,
    year.
       
  • People: family, relative, mother, father, son,
    daughter, sister, brother, husband, wife; colleague, friend, boyfriend,
    girlfriend; people, person, human being, man, woman, lady, gentleman,
    boy, girl, child.
       
  • Objects: address, bag, book, car, clothes, key,
    letter (=to post), light (=lamp), money, name, newspaper, pen, pencil,
    picture, suitcase, thing, ticket.
       
  • Places: place, world, country, town, street, road,
    school, shop, house, apartment, room, ground; Britain, name of the
    foreign country, British town-names, foreign town-names.
       
  • Abstract: accident, beginning, change, color,
    damage, fun, half, help, joke, journey, language, English, name of the
    foreign language, letter (of alphabet), life, love, mistake, news, page,
    pain, part, question, reason, sort, surprise, way (=method), weather,
    work.
       
  • Other: hand, foot, head, eye, mouth, voice; the
    left, the right; the top, the bottom, the side; air, water, sun, bread,
    food, paper, noise.
       

PREPOSITIONS (about 40 words)
   

  • General: of, to, at, for, from, in, on.
       
  • Logical: about, according-to, except, like, against, with, without, by, despite, instead of.
       
  • Space: into, out of, outside, towards, away from,
    behind, in front of, beside, next to, between, above, on top of, below,
    under, underneath, near to, a long way from, through.
       
  • Time: after, ago, before, during, since, until.
       

DETERMINERS (about 80 words)
 

  • Articles and numbers: a, the; nos. 0–20; nos. 30–100; nos. 200–1000; last, next, 1st–12th.
       
  • Demonstrative: this, that.
       
  • Possessive: my, your, his, her, its, our, their.
       
  • Quantifiers: all, some, no, any, many, much, more, less, a few, several, whole, a little, a lot of.
       
  • Comparators: both, neither, each, every, other, another, same, different, such.
       

ADJECTIVES (about 80 words)
   

  • Color: black, blue, green, red, white, yellow.
       
  • Evaluative: bad, good, terrible; important, urgent, necessary; possible, impossible; right, wrong, true.
       
  • General: big, little, small, heavy; high, low; hot,
    cold, warm; easy, difficult; cheap, expensive; clean, dirty; beautiful,
    funny (=comical), funny (=odd), usual, common (=shared), nice, pretty,
    wonderful; boring, interesting, dangerous, safe; short, tall, long; new,
    old; calm, clear, dry; fast, slow; finished, free, full, light (=not
    dark), open, quiet, ready, strong.
       
  • Personal: afraid, alone, angry, certain, cheerful,
    dead, famous, glad, happy, ill, kind, married, pleased, sorry, stupid,
    surprised, tired, well, worried, young.
       

VERBS (about 100 words)
   

  • arrive, ask, be, be able to, become, begin, believe, borrow,
    bring, buy, can, change, check, collect, come, continue, cry, do, drop,
    eat, fall, feel, find, finish, forget, give, going to, have, have to,
    hear, help, hold, hope, hurt (oneself), hurt (someone else), keep, know,
    laugh, learn, leave, lend, let (=allow), lie down, like, listen, live
    (=be alive), live (=reside), look (at), look for, lose, love, make, may
    (=permission), may (=possibility), mean, meet, must, need, obtain, open,
    ought to, pay, play, put, read, remember, say, see, sell, send, should,
    show, shut, sing, sleep, speak, stand, stay, stop, suggest, take, talk,
    teach, think, travel, try, understand, use, used to, wait for, walk,
    want, watch, will, work (=operate), work (=toil), worry, would, write.
       

PRONOUNS (about 40 words)

  • Personal: I, you, he, she, it, we, they, one; myself, yourself, himself, herself, itself, ourselves, yourselves, themselves.
       
  • Possessive: mine, yours, his, hers, its, ours, theirs.
       
  • Demonstrative: this, that.
       
  • Universal: everyone, everybody, everything, each, both, all, one, another.
       
  • Indefinite: someone, somebody, something, some, a few, a little, more, less; anyone, anybody, anything, any, either, much, many.
       
  • Negative: no-one, nobody, nothing, none, neither.
       

ADVERBS (about 60 words)

  • Place: here, there, above, over, below, in front, behind,
    nearby, a long way away, inside, outside, to the right, to the left,
    somewhere, anywhere, everywhere, nowhere, home, upstairs, downstairs.
       
  • Time: now, soon, immediately, quickly, finally,
    again, once, for a long time, today, generally, sometimes, always,
    often, before, after, early, late, never, not yet, still, already, then
    (=at that time), then (=next), yesterday, tomorrow, tonight.
       
  • Quantifiers: a little, about (=approximately), almost, at least, completely, very, enough, exactly, just, not, too much, more, less.
       
  • Manner: also, especially, gradually, of course,
    only, otherwise, perhaps, probably, quite, so, then (=therefore), too
    (=also), unfortunately, very much, well.
       

CONJUNCTIONS (about 30 words)

  • Coordinating: and, but, or; as, than, like.
       
  • Time & Place: when, while, before, after, since (=time), until; where.
       
  • Manner & Logic: how, why, because, since (=because), although, if; what, who, whom, whose, which, that.
      

Oh i love this concept!

I love it too! I love it mostly because it makes me feel less overwhelmed. When you break it down like this, everything seems so much more manageable. Like, hey, I could memorize 20 words at a time (even if ‘at a time’ varies wildly for me), and just do that like ten times. That’s a HUGE chunk of a language.

(And since I have the habit of doing languages that are similar to ones I’m already familiar with, the grammar part usually comes pretty easy, too.)

OK to make a font out of your own writing

light-of-eyllwe:

kayroos-art:

oehbiwan:

kingloptr:

changephase:

keelime-pies:

tenten-ooc:

cobalt-draws:

authorloremipsum:

roachpatrol:

trveroman:

frickmyrickmas:

cannibaltomato:

weavingmemories:

januarycomicsmonth:

zeekist:

saucybroswithbenefits:

jupiters-headlock:

nakadoo:

ilikedaisiesinthespringtime:

davestriderthetimetraveler:

kittenmogu:

chromehearts:

pelicaneggs:

go here

http://www.myscriptfont.com/

instead of printing it off just use this blank thing that way you dont have to scan it or anything

so fill that out by pasting it in any art program and whatnot

then save it and upload it to that site

and itll give you an option to download it

so do that and then install it BAM

image

image

image

I JUST GOT THIS ON MY TABLET IT’S SO COOL OH MY GOD

image

image

image

image

for some reason it refused to recognize the third page of my letters but they were all pretty unnecessary mathematic things anyway so I’m not too worried. still something to keep in mind though, I hope it doesn’t happen for you!

paintfont.com would be a good place to go to quickly make a custom font for your comic!

ehh

It looks just as horrible in real life..even worse with the letter attached…

I’ll try this later.

you can also use alternative alphabets

image

Welp. Guess I know what font I’m gonna be using for comics from now on. B)

Welp. Looks like I have to do this now. So I can use this for Tengri’s asks.

For some reason there is no apostrophe in my set, but it still looks cool.

NEAT THING ALERT

The site is now called https://www.calligraphr.com/en/ but it’s basically the same!

This is so perfect if you want to create a new language for a comic or illustration and you don’t want to draw letter by letter!

So cryptic. Much ancient language

@beesplaybanjos

hello! can i ask for a tutorail in hands/arms and legs/feet?

zemael:

Hey! Sorry for the late reply, I haven’t really had time to do the tutorial for you! But, I did one today. It’s kinda messy and not 100% anatomically perfect (I do several flaws myself) but I think I made some good points!

  • Arms:

image

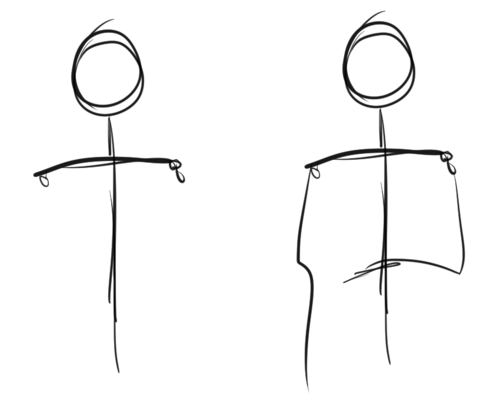
Arms cannot be done without shoulders, so that’s why I will include them here. To know how one body part works, you need to understand the other parts too. I suggest drawing a stick figure, as shown above. Do it with shoulders and everything – don’t care about anatomy. Really, don’t – go mad! You can figure out how to deal with the anatomy AFTER you have figured how to draw the body freely.

image

I imagine most body parts to be shaped as tear drops, as shown above; especially the arms and legs. Draw them above the stick figure – don’t be afraid to overlap the teardrops. In fact, I suggest it! The best way to understand anatomy is to think of it as shapes and doll-parts.

image

After you’ve figured that out, do several, VERY tiny, small doodles like these. Go crazy – don’t bother with anatomy just yet. Do them also very quickly and so small you can’t think of the details. Just keep doing this until you sorta understand how arms work. 

image

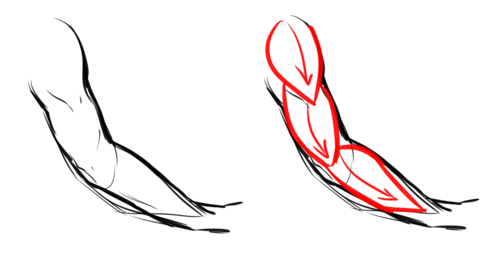
Here is a doodle of a “real” arm, and as you can see, how it’s shaped it resembles the teardrops above. A general rule is to constantly draw the body in curves – male AND female. NEVER draw a single line straight.

image

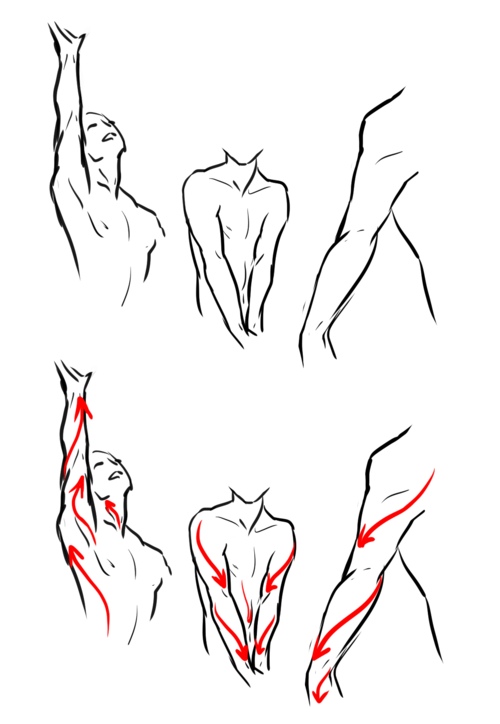
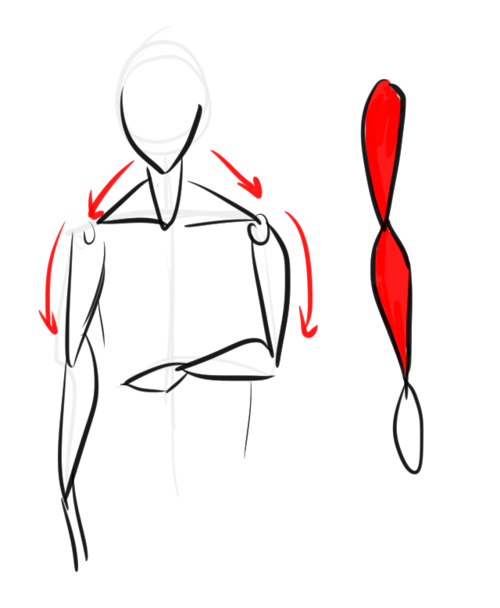
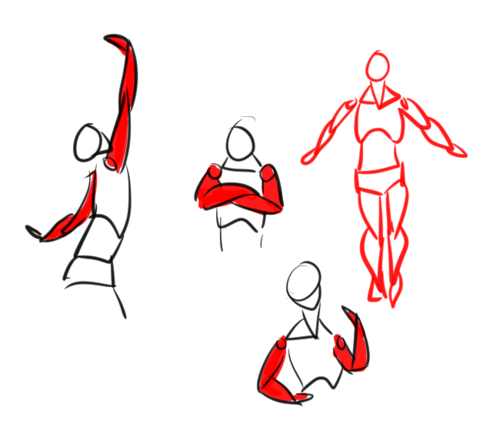
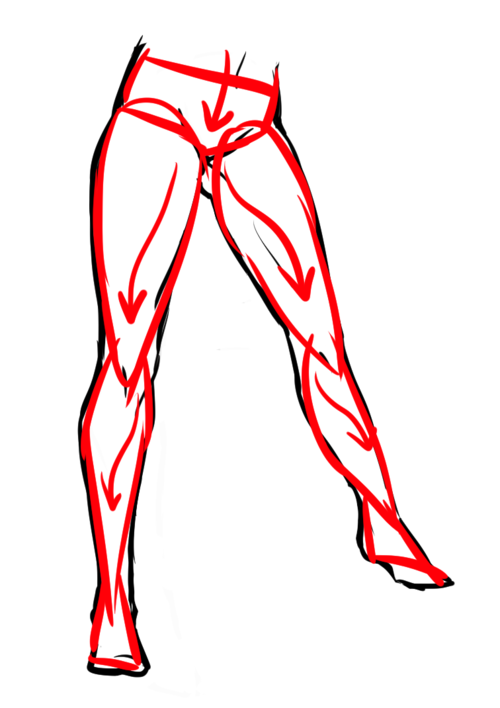
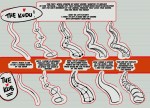
I mentioned before I thought it was important to include shoulders/other body parts to understand another. This is why. The body basically has a “flow” when you move. The red lines clearly shows the flow. This is also how you can create a dynamic pose: think of the flow. The muscles are formed that way to be able to function. Which reminds me, buy some good anatomy books. And I’m talking about more or less MEDICAL anatomy books – you think you won’t need it – but trust me, it’s more useful than you can imagine. I do NOT suggest buying “stylistic” anatomy books, like Christopher Hart (ugh NO), for example, as these can mislead you. Medical anatomy books CANNOT because they MUST be right.

image

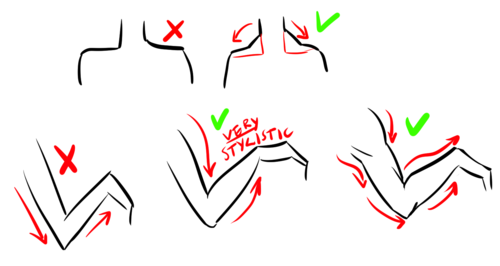
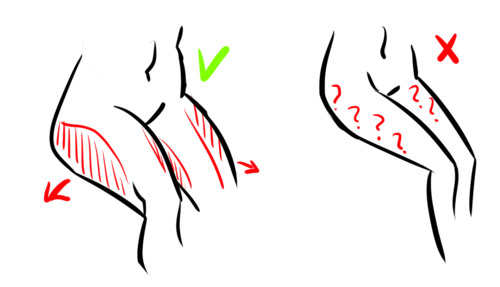
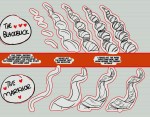
And for the last part, here’s some “do’s” and “don’ts”. It’s important to remember the muscles between the neck and shoulders. Many, especially when drawing females, forget this. It’s true the most visible it is – the more muscular you will look. But even the most petite people have these. Your neck literally would not function if you didn’t have these supporters. Then, the arms below is just to show why it’s important to draw the body with curves. Many have probably heard “straight lines for males” which is a complete lie. They will look stiff and unnatural. Curves can both empathize muscles AND fat. Heck, even your bones aren’t straight.

  • Legs:

image

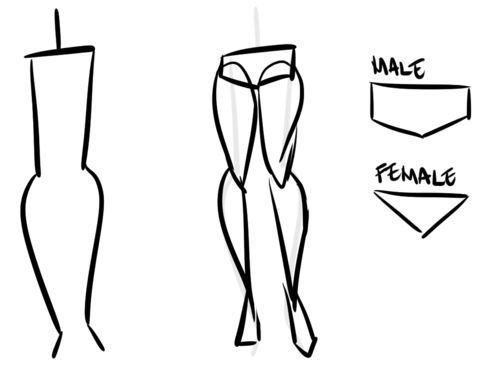
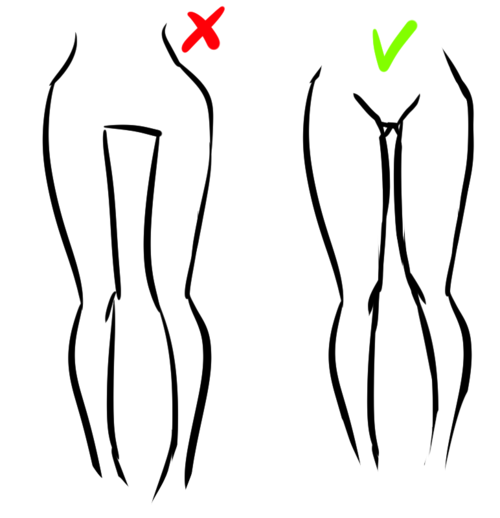
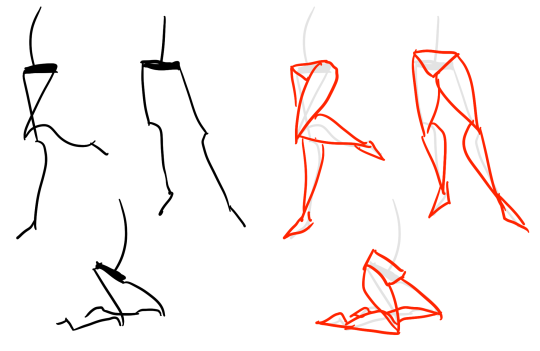
Legs certainly are the hardest. There’s a good reason for this; because they’re one of our most strongest muscles, and they are more or less dominating when it comes to poses (together with the spine). However, just like with the arms, draw a stick figure. I won’t suggest drawing them completely straight, as you can see here, as it will add weight. Do teardrops shapes. As for the hips – think of them as panties or briefs. This is not a MUST; but it will help; I think!

image

And just like the arms, do small doodles. Don’t be serious, play around until you get the idea.

imageimage

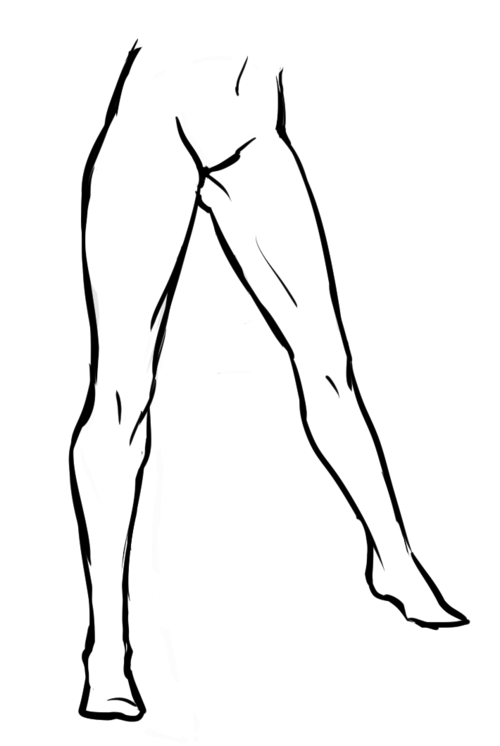
As you can see, these legs easily can be turned into teardrops even when they’re detailed like this.

image

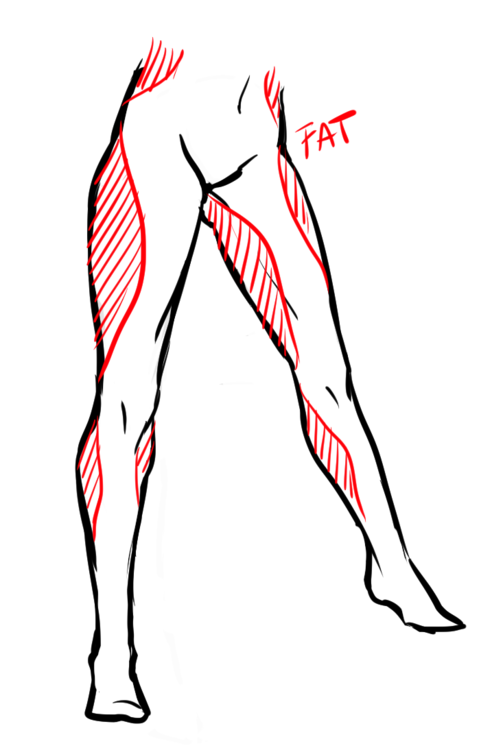
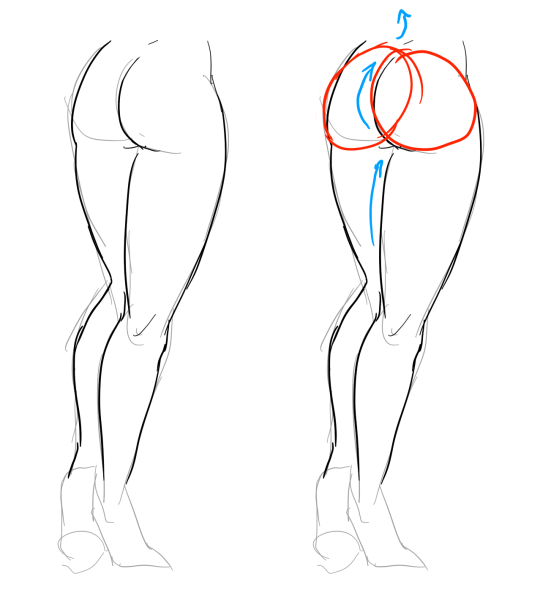
Now, what makes legs/hips interesting is that the way fat gathers there. Although not a must, seeing as we’re all different, females tend to get more fat there than men. Usually, however, it’s not at the SIDE of the hips, but at the thighs, calves and the “love handles”. (Excuse my english, aaah…) Women also tend to have bigger hips, but again, it’s not a must. It’s not uncommon to have small hips, either; or big hips for men, etc.

imageimage

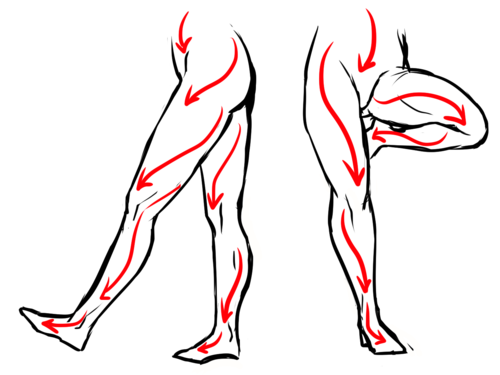
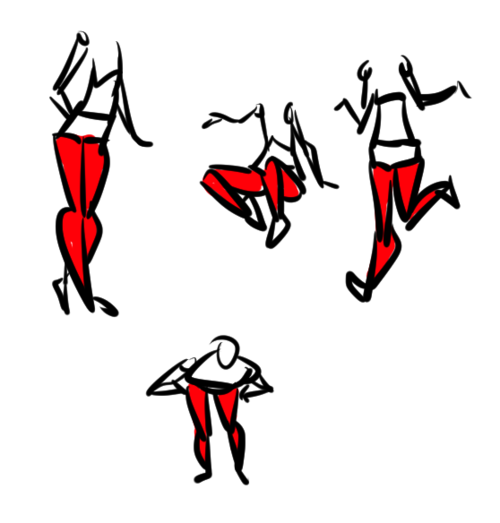
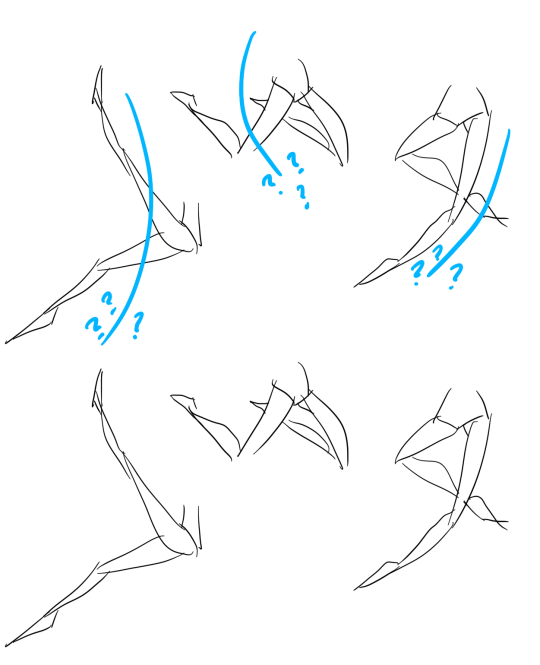
Of course, the legs too follow the “flow”!

image

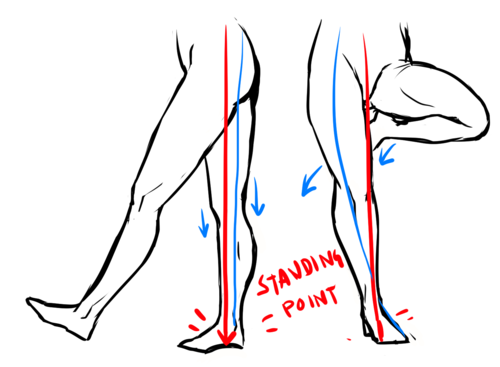
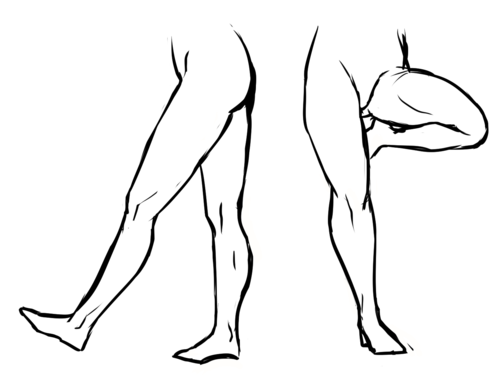
Something worth noting is the “Standing point” The standing point is basically a straight line, and the further away you are from the line; the more unbalanced you are. To create a dynamic pose you should avoid that line as much as possible. However, if you want to look balanced/realistic, have the one leg stand there for support. The leg to the left is balanced, as you can see one of the legs is taking all the weight; with other words, it’s the support leg-making it balanced. The legs to the right, however, are likely to fall over if she keeps standing like that! edit: <- that explanation was horrible. Hope you still get it.

imageimage

Now for some more do’s and don’ts. I already mentioned the barbie legs, invisible heels and micro-mini crotch in my previous tutorial, but these two are different. I see this mistake a lot; when you sit down, your thighs will become wider because you’re pressing all the fat to the sides. Now, this also depends on how you’re positioning your legs. How much it widens depends on how much fat you have in the first place; but it will always be there.

And then there’s this awkward “thigh gap”. Before I get any haters telling me how I “thin shame”, please, take a seat and read this. Good? Good. How much space you actually have between your thighs depends fully on how you’re standing, bending, angle, body type and everything else. However, the one to the left? Not likely.

  • Hands:

image

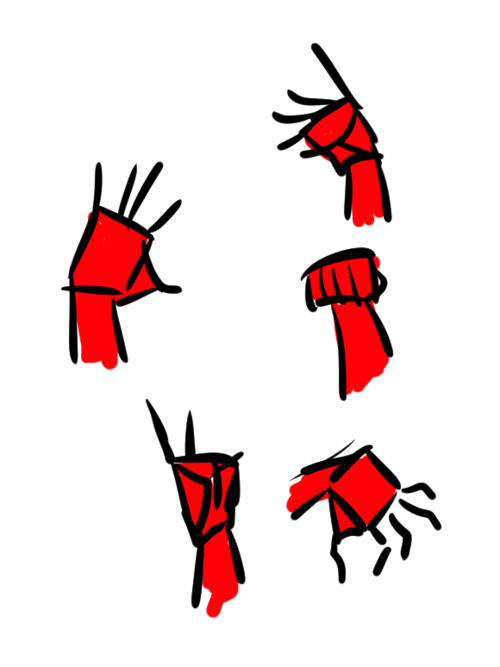
– Okay, I’m getting really lazy now; so I’ll be quick. Draw a rectangle. Sorta like this; it doesn’t have to be exactly like this – since hands can be shaped VERY differently. Just compare to your friends.

– Draw a little triangle attached to it.

– Now, the fingers! How long they should be and etc doesn’t really matter either. But if you’re unsure, draw them as tear drops, too.

– Now, flesh out the fingers! Starting to look like a hand, sort of.

– Then draw the details and fix things you didn’t like. I really don’t like the way this is drawn but I’m just tired right now.

image

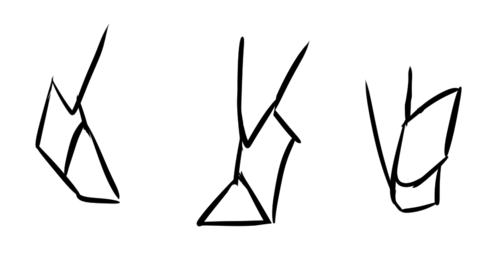
Just like the legs/arms, practice by doing that simple figure really quickly.

  • Feet:

image

Okay, I’m getting really lazy. Plus, feet are SUPER HARD- I’m just going to say this: think of them as triangles. Overlap them; think of it as 3D!

imageimage

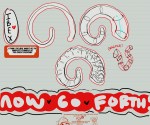
Practice practice practice! And medical anatomy books. And photo references. And real-life references!

Hope this helped! o/ As I said, I’m nowhere near perfect but, ahh, I tried.

Edit: Good damn did I make many typos

I have two questions! First: have you ever thought of doing a tarot card suit for your characters? I think it’d work really well for them! And two: help me how do I draw legs

zemael:

@gravitality

Hi!! I’ve absolutely been thinking about that, yeah, in fact I recently talked about that to my boyfriend just recently. It’ll likely happen after october! And to answer your second question! I made a thing on legs that i hope you’ll find useful!!

So. I’ve already explained basics on legs here, but I don’t think it hurts to go through some extra details to help you understand legs some more.

image

The very basic thing is to imagine legs as teardrops. Again, this has already been covered in said tutorial above, but I figured it’s still good to mention even the most basic thing that I know of. I still highly recommend you check it out to get in more detail and to see some other examples and practices that you do. But basically, think of legs in the shapes of teardrops, when it comes to shape. If you need a simple stick-figure to connect the legs in the first place, make sure that they bend at the knees a bit so that the legs don’t come off as stiff and unnatural. 

image

As you can see, this method works perfectly for realistic legs as it does for stylistic ones. Remember to use these as a guideline, never to be the exact base of the legs you will be drawing. If you draw traditionally, remember not to draw these guides too hard, or they will be hard to erase/do freestyle!

image

But how do you actually draw out the legs without drawing them perfectly straight, as shown to the left? The trick is to add volume to them, and how you do that can be winged to your own liking. The idea is to think in curves. As no leg is perfectly straight. You may make these curves minimal if you don’t want them to be curvy, but keep in mind, still, that not even your own bones are perfectly straight, so it is highly recommended that you make them bend, at least a little. 

image

It all depends on how you draw them as well. Say you put your legs together, as shown in this picture, what happens to the fat and muscle? Naturally, they press together, much like how thighs squish on the surface when you sit down (I’m sure most people know what I’m talking about). Make sure this shows in your art! This is very important to keep in mind, because it makes it all look more natural and believable. Try to cross your legs or stand up and sit down again for real-life examples!

image
image

The same applies for stretching your legs, more or less, except they appear to become more ‘hollow’ and slimmer. They become less soft to the touch, too, and might show. Try stretching your legs and feel where the muscles tense and where it feels ‘hollow’. This is very helpful with your art.

image

Many leg tutorials talk about legs without mentioning the behind. It requires a tutorial on it’s own, in all honesty, but this is the most simplest way to draw it connecting to the legs. Remember that it comes in many different shapes, and this is just a super basic guide! Two circles overlapping, while following the line and flow of the legs. Remember the muscle/fat as mentioned above!

image

Okay, so we got the basics of leg shapes figured out? What if you want o draw them in a certain pose, or with a certain silhouette, but perhaps do not have the reference for it? Or you want to blend your style into it? The key is to not shy away from doodling the form. Make mess, draw lightly and don’t care about the anatomy. That way you’ll get everything down without it appearing stiff. You can clean up the sketch later, always, and if you can, use a reference after you have drawn your pose, to correct your drawing.

image

Remember that the hips do a lot to the pose of the legs! Make sure they are in flow with your legs, so that it can look more natural. Remembers that hips ‘rotate’ with the spine.

image

I’ve talked about this method before when it comes to posing, and the same applies for the legs. One way to make legs appear ‘steady’ is to picture them standing in a line, and one of those legs need not to stray from the lines too much, making it steady. If you want a dynamic pose despite the steady pose, you can always have the other leg stray from the line, since it only matters that one leg is steady. This method can create good, casual poses without making them appear boring. (also notice how the teardrop shapes are used here, despite the highly stylized legs)

image

Do you want a highly dynamic pose, or them to appear unsteady, then skip the line entirely and make both legs aim away from it completely. As you can see, the legs appear more moving, in action, as if they’re fighting, falling, or dancing. As you can imagine, this is not a pose that one could stay steady on, suggesting that it’s taken mid-movement. More about posing and this ‘line’ method is talked about in this tutorial.

Hope this helped you, if you have any questions let me know, and if you’d like to check out all my tutorials they can be found here!

What’s wrong with Gandhi?

orestian:

kasaron:

mariahraemonroe:

thechocolatebrigade:

Where do I begin?

– Criticized the Jews for defending themselves against the Holocaust because he insisted that they should have committed public mass suicide in order to “shame” the Germans instead of fighting back. His exact words were, “But the Jews should have offered themselves to the butcher’s knife. They should have thrown themselves into the sea from the cliffs. As it is, they succumbed anyway in their millions.”

– Wrote an open letter to the British people in 1940 telling them to surrender to the Axis even if it mean accepting genocide.

– Was very anti-black. I hope you can stomach reading how he treated black people in South Africa. It’s fucking disgusting.

– Refused his wife life-saving medication (for religious reasons), but those religious reasons all of a sudden no longer applied to him when he was in a similar position.

– Refused to have sex with his wife for the last 38 years of their marriage. He felt that in order to test his commitment to celibacy, he would have beautiful young women (including his own great niece) lie next to him naked through the night. His wife, whom he described as looking like a “meek cow” was no longer desirable enough to be a solid test.

– Believed that Indian women who were raped lost their value as a human.

– During his time as a dissident in South Africa, he discovered that a young male was harassing two of his female followers. He responded by cutting the girls’ hair off to ensure the “sinner’s eye” was “sterilized.” He later boasted about the incident in his writings, pushing the message to all Indians that women should carry responsibility for sexual attacks upon them.

– Argued that fathers could be justified in killing daughters who had been sexually assaulted for the sake of family and community honor.

– Believed that menstruation was a manifestation of the distortion of a woman’s soul by her sexuality.

– Waged a war against contraceptives, labeling Indian women who used them as whores.

– Held the attitude that women were simply creatures that could bring either pride or shame to the men who own them.

Sources:

Websites:  Women Suffer From Gandhi’s Legacy,  People who most likely chose Gandhi as a historical figure to do a report on and immediately regretted it, On Mahatma Gandhi, his pathetic racism and advancement of segregation of black people by Sentletse Diakanyo, Not All Peaceful: 13 Racist Quotes Gandhi Said About Black People by Nick  Chiles

Books: Sex and Power by Rita Banerji, On Pacifism by Derrick Jensen,  The Collected Works of Mahatma Gandhi

Gandhi was a piece of shit and I hate when people site him as this peaceful angelic type of dude..

Well shit.

yup