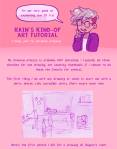
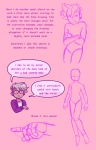
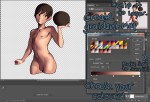
Late last year I wanted to start a series of short tutorials called Tip Jar, as a way of saying thanks to my fans and giving back to my patrons. This is the first of the series I have made, showing my technique on quickly filling in lineart so you can get to painting without coloring outside the lines faster.
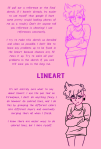
Someday I hope to turn these into video tutorials when I have the income and the time, but for now I hope that I will be able to share useful tips in this infographic format.
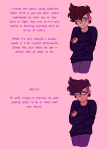
Worth sharing because this is exaaaaactly how I do my flats! I get this question all the time when I post my process videos, and this explains it far more succinctly than I ever could. 🙂
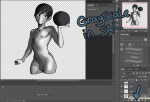
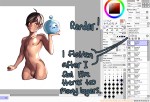
This is also how I do my flats but unfortunately with lines that are see through (or sketchier) you get a lot of jaggies all over the place. So I play with channels!
So alternatively step 1.5 is to click on the channels tab, and create a new layer. Fill the areas that you magic wand(ed) with black (leaving the characters/whatever you want to fill white). Click out of the marquee and use gaussian blur (i use 3.0 on a huge image, sometimes you need to go down for a smaller image)
Then you go to image/adjustments/levels and put in–and this is where I sound like a mad scientist–88 1.42 and 122. Which cleans up the edges so they’re pretty clean!
Then all you do is click on the circle at the bottom of the channels area (”load channel as selected) and then go back in to layers and click on a layer to load your original view again! and then do the rest of the steps. It will cause you to clean up corners a lot but it saves me a whole heck of time since i have a rougher inking style. This step takes all of 3 minutes at most but otherwise I’d have to base everything by hand :I Or spend a good 40 minutes cleaning up jaggies.
TL;DR alternative step if you have rougher/sketchier lines.
Oh! Since my lines often don’t join correctly, I create a layer underneath and fill any holes before i do selection (with “select all layers” ticked off) which is admittedly tedious but again. Way quicker than doing it by hand! So yeah if you see this and are like oh gee whiz this doesn’t work with how I do stuff, try this added step?
(this is also how to do a stroke around an image that is cleaner than what you get from the layer styles box– I adapted these steps originally from a DA tutorial on how to get clean strokes!)
I’ve been getting quite a few asks about the process for the patterns in my stylized artworks, so I decided to put together a couple of tips regarding them.
Firstly, what you need are
— CUSTOM BRUSHES —
Most of the patterns I use are custom brushes I made, such as those:
For the longest time I was convinced making brushes must be super extra complicated. I was super extra wrong. All you need to start is a transparent canvas (2500px x 2500px max):
This will be your brush tip. When you’re satisfied how it looks, click Ctrl+A to select the whole canvas and go to ‘define brush preset’ under the edit menu
You will be asked to name your new glorious creation. Choose something that describes it well, so you can easily find it between all the ‘asfsfgdgd’ brushes you’ve created to be only used once
This is it. Look at it, you have just created a photoshop brush. First time i did I felt like I was cheated my whole life. IT’S SO EASY WHY HASN’T ANYONE TOLD ME
Time to edit the Good Boi to be more random, so it can be used as a Cool Fancy Pattern. Go into brush settings and change whatever you’d like. Here’s a list of what I do for patterns:
– under Shape Dynamics, I increase Size Jitter and Angle jitter by 5%-15%
– under Brush Tip Shape, I increase spacing by a shitload. Sometimes it’s like 150%, the point is to get the initial brush tip we painted to be visible.
– If I want it to look random and noisy, I enable the Dual Brush option, which acts like another brush was put on top of the one we’ve created. You can adjust all of the Dual Brush options (Size, Spacing, Scatter, Count) as you wish to get a very nice random brush to smear on your backgrounds
The result is as above. You can follow the same steps to create whatever brush you need: evenly spaced dots that look like you painted them by hand, geometric pattern to fill the background, a line of perfectly drawn XDs and so on.
BUT WAIT, THERE’S MORE
— PATHS —
But what if you want to get lots of circles made of tiny dots? Or you need rows of triangles for your cool background? Photoshop can do all of that for you, thanks to the magic of paths.
Typically, paths window can be found right next to Layers:
Draw whatever path you want, the Shape Tool has quite a bit of options. Remember, paths are completely different from brush strokes and they won’t show up in the navigator. To move a path around, click A to enable path selection tool. You can use Ctrl+T to transform it, and if you move a path while pressing Alt it will be duplicated.
Now, pick a brush you wish really was in place of that path you’ve drawn and go to layers, then choose the layer you want it to be drawn on. Then, click this tiny circle under the Paths window:
Then witness the magic of photoshop doing the drawing for you while you wonder how tf have you managed to forget about this option for the past 2 years
You can combine special brushes and paths for all sorts of cool effects. I mostly use them in backgrounds for my cards, but you can do whatever you want with them.
I hope that answers the questions for all of the people who were sending me inquires about the patterns. If you have any questions regarding this or any other Photoshop matter feel free to message me, I’m always up for complaining about how great and terrible Photoshop is C’:
Like I said, I’m not good at explaining things, but I hope this helped at least a little bit! I didn’t really mention this in the tutorial, but my way of drawing is obviously stylized…most of the characters I draw have short torsos, long legs, hands and feet that are either too big or too small, and of course big heads, facial features and hair, if you want to try anything like that! I wasn’t entirely sure what to say, so if theres anything more specific you want to ask, go ahead and I’ll try to answer it !!
Masking fluid is, essentially, liquid rubber. It adheres to the paper and protects an area from watercolour. When the paint dries, you simply remove it. There are different types of masking fluid, like the ones you apply with a brush. But if you’re like me and want to cut the crap with RUINING BRUSHES: look no further. I exclusively use Molotow masking liquid pens now.
You don’t need sacrificial brushes. It’s tinted blue so you can see where the hell it is. The future is here.
Rolls on like a kickass pen
Let it dry, slap on your watercolour
Coax it off with an eraser
Bam look at that. Perfect for those details you want to stay white. Not recommended for application over large areas. Available on Amazon.
You must be logged in to post a comment.