honestly some of y’all want a significant other so badly and can’t understand why you can’t find one, but have no sense of boundaries or healthy expectations of what a relationship is like. in a committed long-term partnership you get left on read, you wait for texts back, and you can forget about each other when you’re busy. sometimes you fall asleep without saying goodnight and sometimes you’re too caught up to text each other before 6pm. that’s how it is. thinking that you can’t be deeply, beautifully in love and still wait more than “1.75 hours” for a text back is such an unhealthy and unreasonable expectation of what love is, and you shouldn’t be in a relationship if you can’t allow the other person to exist on their own apart from you. if you’re projecting your anxieties and insecurities onto a partner who doesn’t even exist yet, then you aren’t ready for one.
A CROW TRIED TO GO IN OUR CLASSROOM AND HE HAD A PEN
yes hello i am here to learn geometries
That crow is more prepared than some of my students.
You’ve all just like, completely skipped over the possibility that this crow has seen people using pens in this room, found one, and is trying to return it. There’s been videos of crows picking up sweet wrappers and stuff and placing them in bins after seeing humans put their litter in bins. I really do believe that this crow is trying to return the pen and that is ADORABLE AS HELL.
THEY ARE SO SMART I LOVE THEM
Crows are thought to be self aware by some scientists. Its perfectly possible the crow wants to return the pen to humans. Knowing it belongs to humans.
Corvids. Who KNOWS. 🙂
Another cool crow deal: Once, when trying to assess if crows could reason and use tools, scientists had two crows who didn’t know each other each take a wire from a table (one was hooked, one was straight) and try to grab meat from a bottle with it. The crows could see each other, though they had separate bottles. Only the straight wire worked for this, so they hypothesized that if crows could reason, the second trial would have the two crows fighting over the straight wire. The second trial started and, to the surprise of the scientists, the two crows both went for the bent wire, one held it down and the other unbent it. They both got meat out of their bottles. They came to a peaceful solution without verbal communication. Crows are probably smarter than we are.
they still shit all over the place and eat garbage
Hey! Sorry for the late reply, I haven’t really had time to do the tutorial for you! But, I did one today. It’s kinda messy and not 100% anatomically perfect (I do several flaws myself) but I think I made some good points!
Arms:
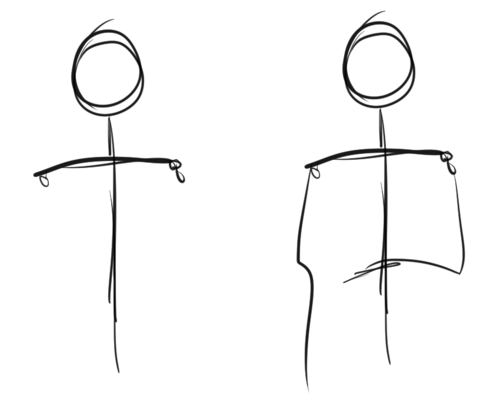
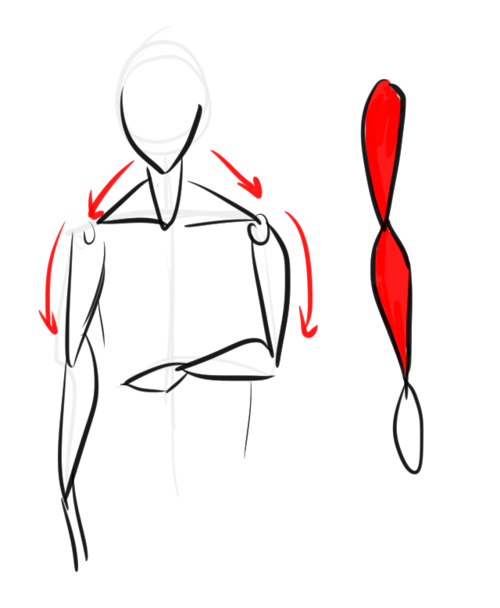
Arms cannot be done without shoulders, so that’s why I will include them here. To know how one body part works, you need to understand the other parts too. I suggest drawing a stick figure, as shown above. Do it with shoulders and everything – don’t care about anatomy. Really, don’t – go mad! You can figure out how to deal with the anatomy AFTER you have figured how to draw the body freely.
I imagine most body parts to be shaped as tear drops, as shown above; especially the arms and legs. Draw them above the stick figure – don’t be afraid to overlap the teardrops. In fact, I suggest it! The best way to understand anatomy is to think of it as shapes and doll-parts.
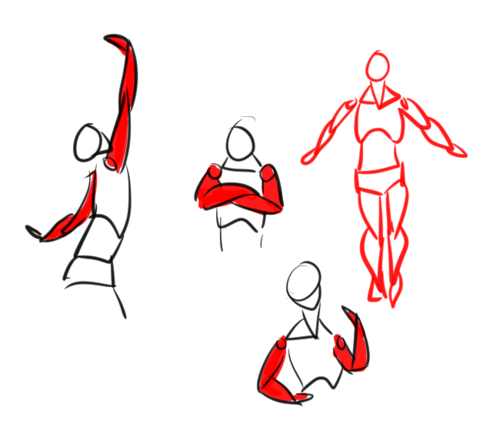
After you’ve figured that out, do several, VERY tiny, small doodles like these. Go crazy – don’t bother with anatomy just yet. Do them also very quickly and so small you can’t think of the details. Just keep doing this until you sorta understand how arms work.
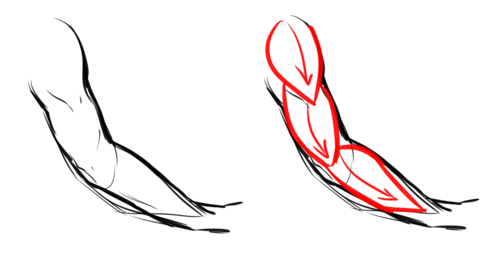
Here is a doodle of a “real” arm, and as you can see, how it’s shaped it resembles the teardrops above. A general rule is to constantly draw the body in curves – male AND female. NEVER draw a single line straight.
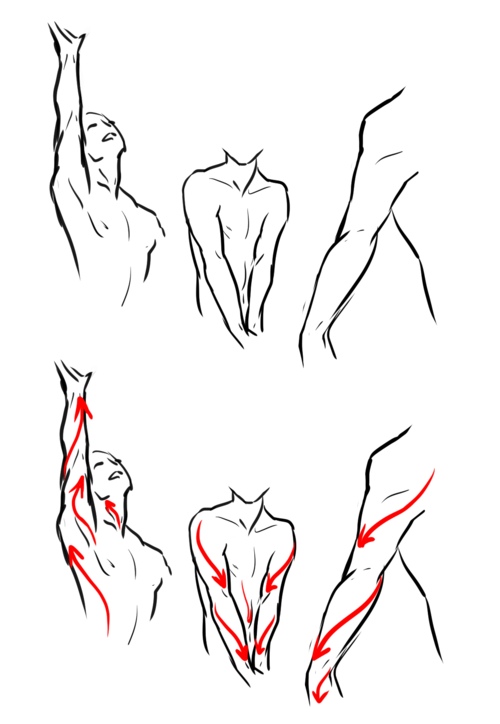
I mentioned before I thought it was important to include shoulders/other body parts to understand another. This is why. The body basically has a “flow” when you move. The red lines clearly shows the flow. This is also how you can create a dynamic pose: think of the flow. The muscles are formed that way to be able to function. Which reminds me, buy some good anatomy books. And I’m talking about more or less MEDICAL anatomy books – you think you won’t need it – but trust me, it’s more useful than you can imagine. I do NOT suggest buying “stylistic” anatomy books, like Christopher Hart (ugh NO), for example, as these can mislead you. Medical anatomy books CANNOT because they MUST be right.
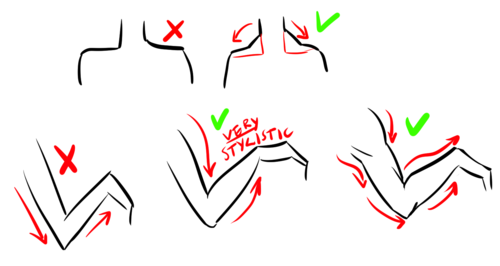
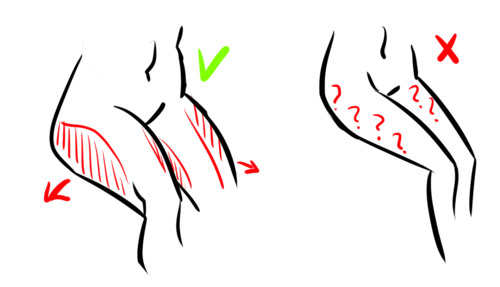
And for the last part, here’s some “do’s” and “don’ts”. It’s important to remember the muscles between the neck and shoulders. Many, especially when drawing females, forget this. It’s true the most visible it is – the more muscular you will look. But even the most petite people have these. Your neck literally would not function if you didn’t have these supporters. Then, the arms below is just to show why it’s important to draw the body with curves. Many have probably heard “straight lines for males” which is a complete lie. They will look stiff and unnatural. Curves can both empathize muscles AND fat. Heck, even your bones aren’t straight.
Legs:
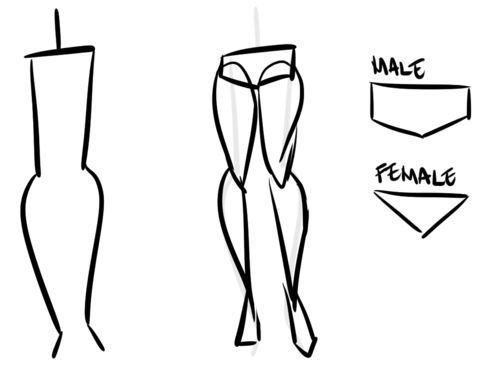
Legs certainly are the hardest. There’s a good reason for this; because they’re one of our most strongest muscles, and they are more or less dominating when it comes to poses (together with the spine). However, just like with the arms, draw a stick figure. I won’t suggest drawing them completely straight, as you can see here, as it will add weight. Do teardrops shapes. As for the hips – think of them as panties or briefs. This is not a MUST; but it will help; I think!
And just like the arms, do small doodles. Don’t be serious, play around until you get the idea.
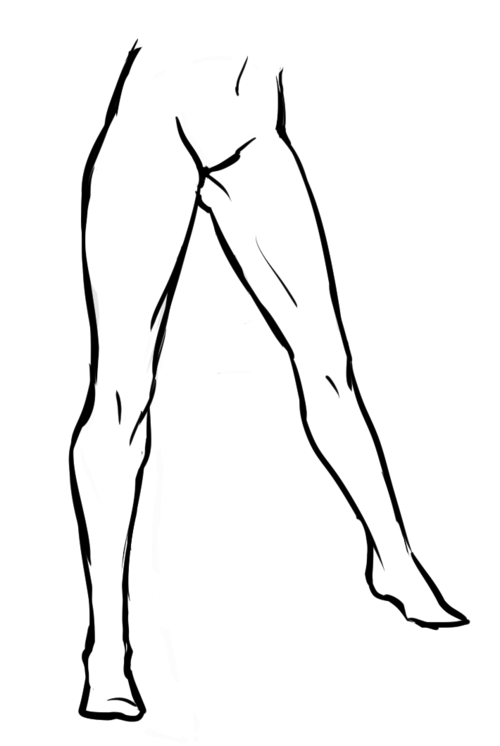
As you can see, these legs easily can be turned into teardrops even when they’re detailed like this.
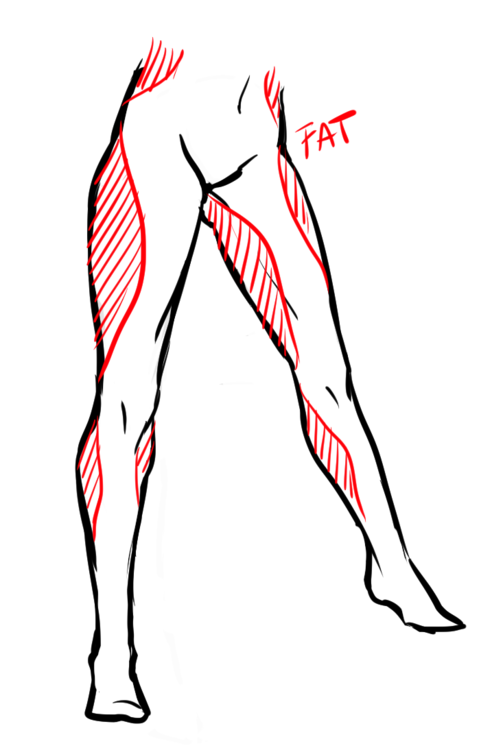
Now, what makes legs/hips interesting is that the way fat gathers there. Although not a must, seeing as we’re all different, females tend to get more fat there than men. Usually, however, it’s not at the SIDE of the hips, but at the thighs, calves and the “love handles”. (Excuse my english, aaah…) Women also tend to have bigger hips, but again, it’s not a must. It’s not uncommon to have small hips, either; or big hips for men, etc.
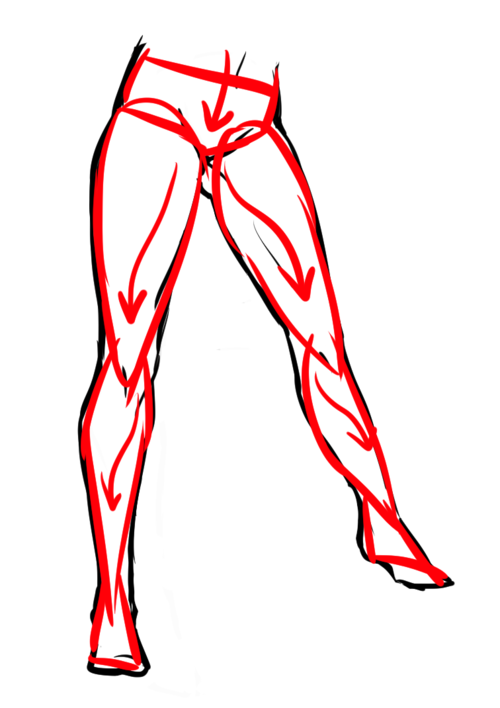
Of course, the legs too follow the “flow”!
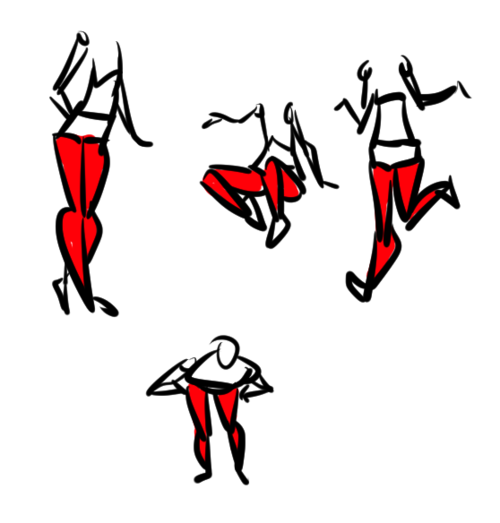
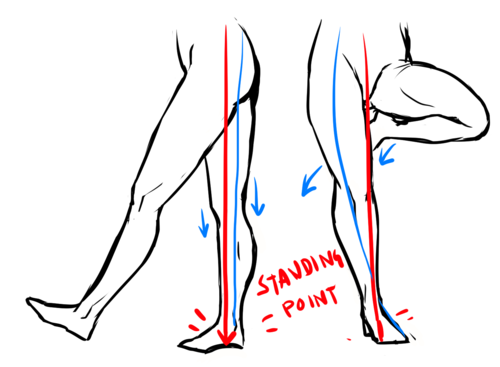
Something worth noting is the “Standing point” The standing point is basically a straight line, and the further away you are from the line; the more unbalanced you are. To create a dynamic pose you should avoid that line as much as possible. However, if you want to look balanced/realistic, have the one leg stand there for support. The leg to the left is balanced, as you can see one of the legs is taking all the weight; with other words, it’s the support leg-making it balanced. The legs to the right, however, are likely to fall over if she keeps standing like that! edit: <- that explanation was horrible. Hope you still get it.
Now for some more do’s and don’ts. I already mentioned the barbie legs, invisible heels and micro-mini crotch in my previous tutorial, but these two are different. I see this mistake a lot; when you sit down, your thighs will become wider because you’re pressing all the fat to the sides. Now, this also depends on how you’re positioning your legs. How much it widens depends on how much fat you have in the first place; but it will always be there.
And then there’s this awkward “thigh gap”. Before I get any haters telling me how I “thin shame”, please, take a seat and read this. Good? Good. How much space you actually have between your thighs depends fully on how you’re standing, bending, angle, body type and everything else. However, the one to the left? Not likely.
Hands:
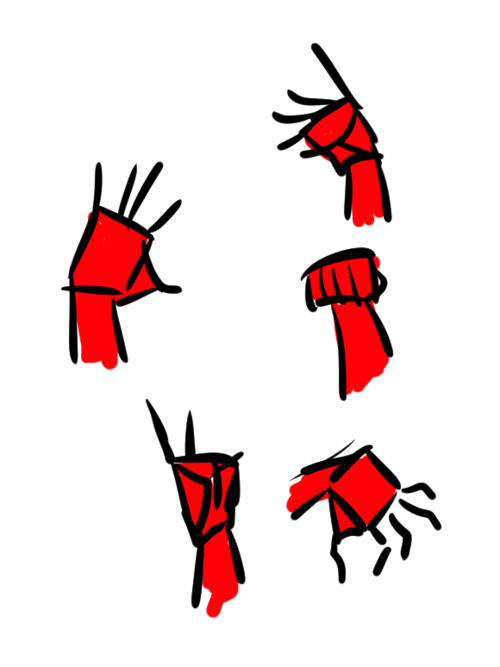
– Okay, I’m getting really lazy now; so I’ll be quick. Draw a rectangle. Sorta like this; it doesn’t have to be exactly like this – since hands can be shaped VERY differently. Just compare to your friends.
– Draw a little triangle attached to it.
– Now, the fingers! How long they should be and etc doesn’t really matter either. But if you’re unsure, draw them as tear drops, too.
– Now, flesh out the fingers! Starting to look like a hand, sort of.
– Then draw the details and fix things you didn’t like. I really don’t like the way this is drawn but I’m just tired right now.
Just like the legs/arms, practice by doing that simple figure really quickly.
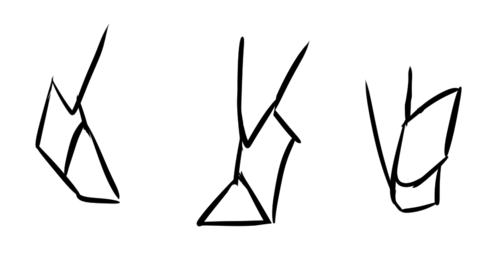
Feet:
Okay, I’m getting really lazy. Plus, feet are SUPER HARD- I’m just going to say this: think of them as triangles. Overlap them; think of it as 3D!
Practice practice practice! And medical anatomy books. And photo references. And real-life references!
Hope this helped! o/ As I said, I’m nowhere near perfect but, ahh, I tried.
if you dont believe in god thats fine but when extremely horrible things have happened and people are praying for the lost souls of children, it is not the time to speak up. it is not just “stating your opinion” it’s being an asshole
I reblog this as an atheist who really wishes other atheists would shut the fuck up and let people deal with tragedy in their own way that hurts no one.
Aaaaand the opposite is also true. If a horrible tragedy befalls an atheist, don’t try to use it as an opportunity to lead them to Jesus.
BOTH OF THESE ARE SOOOO IMPORTANT JUST LET PEOPLE GRIEVE !!!
It’s been a while since I fucked up a song this badly, so here you go
Lyrics: … spirit’s sleeping somewhere cold Until you find it there, and lead it back home Up me wake! Up me wake inside! Can’t me wake! Up me wake insi- kMEEEEEEEEE Call my name and save meɘm ɘvɒƨ Up me wake! Bid bid blood blood blood Up me wake! For- Me wake WAKE! Save me! Save me from the nothing I’ve become (sound of the song ascending)
Hi!! I’ve absolutely been thinking about that, yeah, in fact I recently talked about that to my boyfriend just recently. It’ll likely happen after october! And to answer your second question! I made a thing on legs that i hope you’ll find useful!!
So. I’ve already explained basics on legs here, but I don’t think it hurts to go through some extra details to help you understand legs some more.
The very basic thing is to imagine legs as teardrops. Again, this has already been covered in said tutorial above, but I figured it’s still good to mention even the most basic thing that I know of. I still highly recommend you check it out to get in more detail and to see some other examples and practices that you do. But basically, think of legs in the shapes of teardrops, when it comes to shape. If you need a simple stick-figure to connect the legs in the first place, make sure that they bend at the knees a bit so that the legs don’t come off as stiff and unnatural.
As you can see, this method works perfectly for realistic legs as it does for stylistic ones. Remember to use these as a guideline, never to be the exact base of the legs you will be drawing. If you draw traditionally, remember not to draw these guides too hard, or they will be hard to erase/do freestyle!
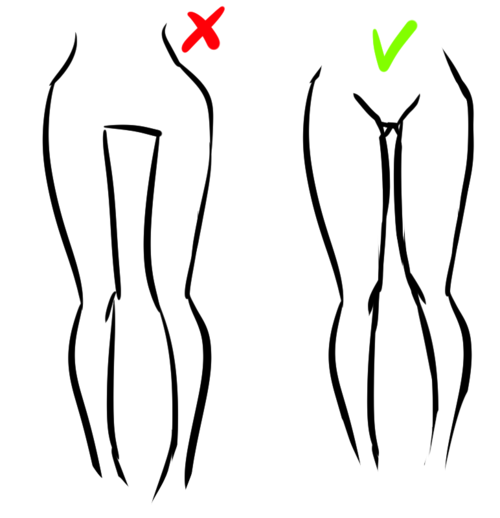
But how do you actually draw out the legs without drawing them perfectly straight, as shown to the left? The trick is to add volume to them, and how you do that can be winged to your own liking. The idea is to think in curves. As no leg is perfectly straight. You may make these curves minimal if you don’t want them to be curvy, but keep in mind, still, that not even your own bones are perfectly straight, so it is highly recommended that you make them bend, at least a little.
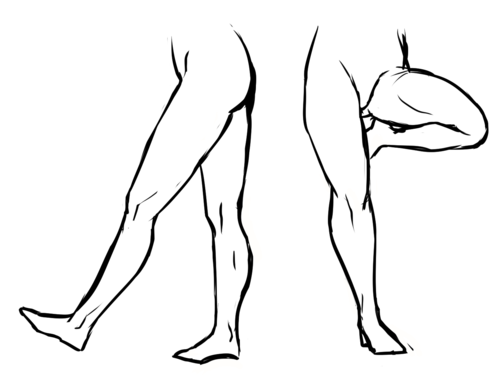
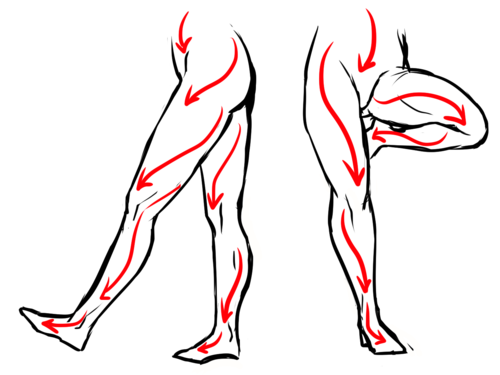
It all depends on how you draw them as well. Say you put your legs together, as shown in this picture, what happens to the fat and muscle? Naturally, they press together, much like how thighs squish on the surface when you sit down (I’m sure most people know what I’m talking about). Make sure this shows in your art! This is very important to keep in mind, because it makes it all look more natural and believable. Try to cross your legs or stand up and sit down again for real-life examples!
The same applies for stretching your legs, more or less, except they appear to become more ‘hollow’ and slimmer. They become less soft to the touch, too, and might show. Try stretching your legs and feel where the muscles tense and where it feels ‘hollow’. This is very helpful with your art.
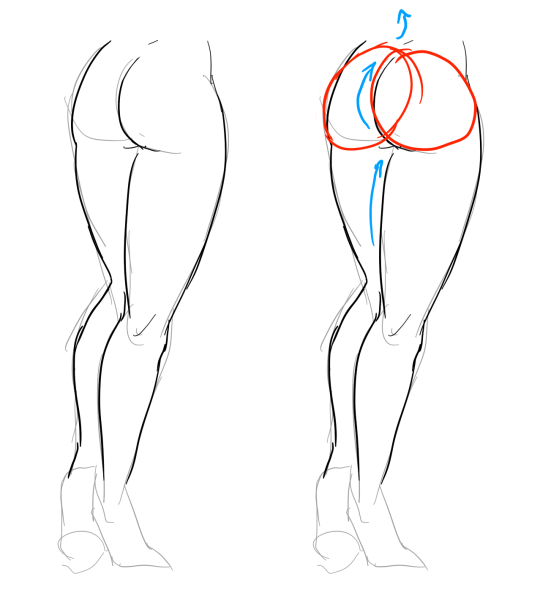
Many leg tutorials talk about legs without mentioning the behind. It requires a tutorial on it’s own, in all honesty, but this is the most simplest way to draw it connecting to the legs. Remember that it comes in many different shapes, and this is just a super basic guide! Two circles overlapping, while following the line and flow of the legs. Remember the muscle/fat as mentioned above!
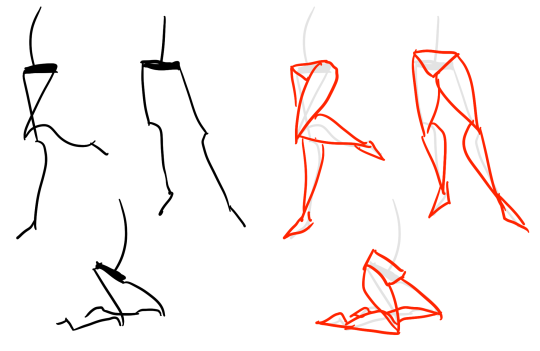
Okay, so we got the basics of leg shapes figured out? What if you want o draw them in a certain pose, or with a certain silhouette, but perhaps do not have the reference for it? Or you want to blend your style into it? The key is to not shy away from doodling the form. Make mess, draw lightly and don’t care about the anatomy. That way you’ll get everything down without it appearing stiff. You can clean up the sketch later, always, and if you can, use a reference after you have drawn your pose, to correct your drawing.
Remember that the hips do a lot to the pose of the legs! Make sure they are in flow with your legs, so that it can look more natural. Remembers that hips ‘rotate’ with the spine.
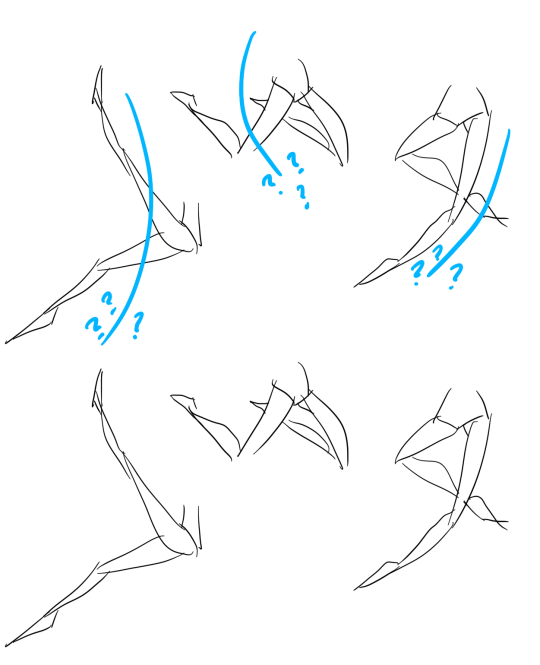
I’ve talked about this method before when it comes to posing, and the same applies for the legs. One way to make legs appear ‘steady’ is to picture them standing in a line, and one of those legs need not to stray from the lines too much, making it steady. If you want a dynamic pose despite the steady pose, you can always have the other leg stray from the line, since it only matters that one leg is steady. This method can create good, casual poses without making them appear boring. (also notice how the teardrop shapes are used here, despite the highly stylized legs)
Do you want a highly dynamic pose, or them to appear unsteady, then skip the line entirely and make both legs aim away from it completely. As you can see, the legs appear more moving, in action, as if they’re fighting, falling, or dancing. As you can imagine, this is not a pose that one could stay steady on, suggesting that it’s taken mid-movement. More about posing and this ‘line’ method is talked about in this tutorial.
Hope this helped you, if you have any questions let me know, and if you’d like to check out all my tutorials they can be found here!


You must be logged in to post a comment.